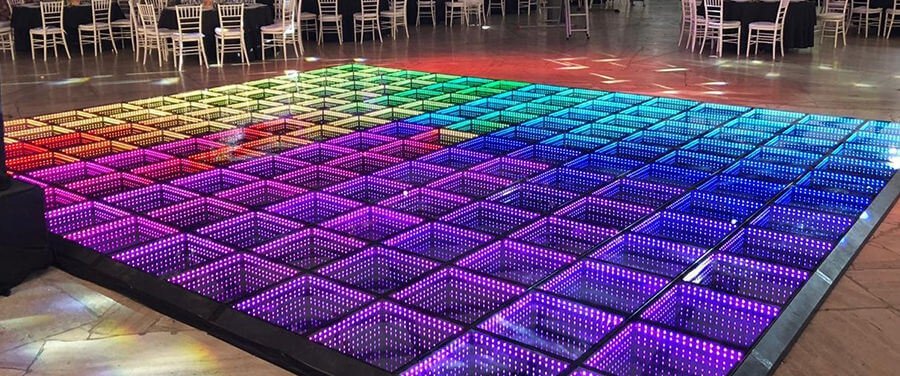
LED dance floors have become an essential component in high-energy event settings, instantly transforming spaces with vivid colors and dynamic lighting that syncs with the music and movement around them. Whether you’re organizing a wedding, a corporate party, or a disco-themed celebration, a custom-built LED dance floor can create a captivating and immersive experience that guests will remember. For those looking to avoid the complexities of DIY, LED Dance Floor Rentals provide a seamless, hassle-free alternative that ensures a polished and professional look.
In this guide, we’ll take you through the basics of constructing a light-up dance floor from scratch and the key factors to ensure optimal performance. On the other hand, if your needs are one-time or if you prefer a quick setup, LED or Disco Floor Rentals provide a practical, ready-to-use solution.
Step 1: Determine the Dance Floor Size
The first step in creating an LED dance floor is determining the required size. Think about your venue’s layout and the anticipated number of attendees. A common guideline is to allocate 4-5 square feet of dance floor per person. For example, if you plan to host 100 guests, you’ll need around 400 square feet of dance space. Establishing the size is essential as it directly impacts the number of LED panels you’ll need, whether for a DIY setup or a Dance Floor Rental.
Step 2: Choose Quality Materials
To construct a durable and eye-catching LED dance floor, selecting high-quality materials is essential:
LED Panels: These panels are the star of the show, providing vibrant and customizable lighting effects. Choose panels specifically designed for dance floors, capable of handling foot traffic and displaying multiple colors and patterns.
Support Frame: A sturdy, leveled frame—preferably made of aluminum or steel—is necessary to support the LED panels and ensure stability during use.
Wiring and Power Supply: Proper wiring and a stable power source are critical for safely powering the LEDs. Unless you have experience with electrical setups, consider consulting a professional to ensure proper installation.
Protective Covering: Transparent acrylic or tempered glass coverings protect the LEDs from damage while allowing light to pass through. These layers create a smooth surface, making the floor safe and comfortable for dancing.
For those considering Light-up Dance Floor Rentals, most rental providers offer complete packages that include all materials, as well as setup and breakdown services.
Step 3: Installation Process
After gathering the materials, it’s time to assemble the LED dance floor.
1. Lay the Foundation: Start by setting up the frame on a flat, clean surface. Ensure the frame is level to avoid uneven areas where the LED panels might be damaged.
2. Install LED Panels: Place each LED panel securely within the frame to prevent shifting during use. If using rented panels, make sure they are installed according to the rental provider’s instructions.
3. Wiring: Carefully wire each panel to the power source, ensuring secure, insulated connections. You may also want to add a control unit to allow for programmed lighting effects.
4. Protective Covering: Once wired, add the acrylic or tempered glass cover on top. This layer will safeguard the LEDs and provide a smooth surface for guests.
Step 4: Testing and Customization
Once installed, test the dance floor to ensure everything is working as planned. Use the control panel to program lighting patterns—whether strobe lights, slow fades, or lights that synchronize with music. For a classic disco effect, set up multicolored squares that flash in sequence, capturing the nostalgic vibe of a ’70s Disco Dance Floor.
Step 5: Maintenance and Safety
Safety and maintenance are vital, whether for a DIY dance floor or a rental. Regularly check all wiring and power connections to prevent malfunctions during your event. Additionally, inspect the protective covering for any damage and follow safety protocols to ensure a secure dancing environment.
Additional Tips for Enhancing the Experience
For a truly memorable dance floor experience, consider adding motion sensors that trigger lighting effects based on where guests are dancing. This interactive feature can add an exciting, high-tech element, making the floor feel even more dynamic. Some advanced control systems also allow you to sync the lighting with a live DJ’s music set, creating real-time light and sound synchronization that elevates the energy in the room.
Another innovative option is to incorporate digital projections or visual effects on the dance floor. By layering projections with LED lights, you can produce stunning visuals that change in response to the music, creating an immersive environment. This technique works particularly well for themed events, where visuals can match the overall theme, enhancing the ambiance and making the dance floor the center of attention. Whether you go the DIY route or opt for rentals, these additions can turn an LED dance floor into an unforgettable part of your event.


